Friday, December 31, 2010

New Year's Resolutions

Here we are, the end of another year.  It's been a very busy year too.  There have been a lot of changes in the ol' Rodriguez kitchen, the biggest being Paulo's wheat allergy diagnosis.  I've had to learn to bake and cook in a whole new way.  It has gone well though, I would say he's happier and I know he's healthier, so all of the work is 100% worth it.

I often find myself making food resolutions come the New Year.  In the past there has been to rid the kitchen of artificial dyes, there was also the year of no HFCS.  This year is no different I have my food goals which I will happily share with you!
  1. I want to learn to make an awesome pot of soup, feel free to forward me recipes that you love!
  2. I will experiment with one cake recipe a month until I find the one I, and Paulo, love the best.
  3. I will continue experimenting with vegetarian and vegan cuisine, trying at least one new recipe a month, while keeping my old favorites in the weekly rotation. 
  4. If I buy it, I eat it!  I despise throwing out food that went bad.  I feel so guilty!  To do this though will require renewed dedication to meal planning and also being more realistic in what I buy.  It doesn't matter if the kale is a great price if I can't finish the bunch(es) before it turns! 
I want to focus on planning ahead and making my life easier.  These last couple months in particular have been extremely hectic both personally and professionally, and I know that if I can save a few minutes in the kitchen every day I can find some of that downtime I'm desperately seeking. So, today I will cook up extra beans and freeze them.  Tomorrow I will cook up a pot of rice to prepare for the week.  I will return to the tradition of cleaning and prepping what veggies I can after I shop.  I will seek out simple, healthy, meals for my family.  I will cook once and eat twice and I will find ways to work my crock pot back into my weekly rotation!  I will find ways to simultaneously nurture my family and myself, that will be my greatest task for 2011.

Marinated Fiesta Chicken


Marinated fiesta chicken
  • 2-3 chicken breasts
  • 1/4 cup red wine vinegar
  • 3/4 cup canola oil
  • 1 tablespoon taco seasoning mix
  • 1 tablespoon sugar
Mix the marinade ingredients in a small bowl and pour over the chicken, turning to coat.  Allow to marinate for at least one hour-longer is better-turning occasionally.

Preheat the oven to 350.

Heat a stainless steel, oven save pan, over medium heat and coat with olive oil.  Brown the chicken on both sides and then finish cooking in the oven for about 20-25 minutes depending on the thickness of the chicken.

Thursday, December 30, 2010

Taco Seasoning

We love tacos, we eat them often.  Crunchy taco Friday is a family tradition.  What I did not love though was the premade taco seasoning mix.  For one, way too salty, I routinely used 1/3-1/2 depending on the amount of meat I was seasoning.  For another, why all the extra stuff?? 

Wheat, Flour, Salt, Dried Garlic, Maltodextrin, Chili Peppers, Spice, Dried Onions, Monosodium Glutamate, Paprika, Sugar, Contains less than 2% of Silicon Dioxide As An Anticaking Agent, Soybean Oil, Malic Acid.

http://www.amazon.com/Taco-Bell-Seasoning-1-25-Ounce-Pouches/dp/B000E1FZJG

Wheat?  Flour?  MSG?  Soybean oil??  Malic acid??  What is malic acid?  Oh, I see, it makes food taste more tart, more sour, but why is it in Taco Bell's premade seasoning? 

I know that there are others that don't have as much extra stuff.

SPICES (INCLUDING CHILI PEPPER, CUMIN, OREGANO, AND RED PEPPER), ONION, WHEY SOLIDS (MILK), SALT, SUGAR, PAPRIKA, GARLIC, POTATO STARCH, AND CITRIC ACID.


http://www.mccormick.com/Products/Seasoning-Mixes/Mexican/Taco-Seasoning-Mix.aspx

But again, there is something on the naughty list for us, milk solids....why is that in there?? 

My third beef with premade taco mix, the price.  I mean really, the amount of spices that are in those cost pennies, but I'm paying how much for a little envelope of the mix?!  Yeah, I don't think so.

Krista's taco seasoning mix:
1/2 teaspoon each garlic powder, paprika, sea salt, oregano and cumin
1/4 teaspoon pepper

Mix well in a small bowl and transfer to a ziploc bag.  EASY and much, much cheaper!

Wednesday, December 29, 2010

Beef tenderloin in mushroom wine gravy

Oh Giada...how I love you.  I admit, she's my chef crush.  I really love to watch her show, she cooks with gusto, and she's gorgeous.  A few weeks before Christmas I was watching Food Network with Paulo and saw her cook a stay at home fancy dinner for her husband and two friends which immediately made me think....CHRISTMAS!  You see, my family had decided we would spread Christmas out this year, we spent the Eve with my husbands family and we spent the 26th with mine leaving my little family completely free and clear on Christmas Day.  Rene and I talked about taking Paulo out to a fancy dinner downtown but by then I'd already been thinking about this beef recipe I saw and frankly didn't want to drop, easily, $100 on dinner out.  So we stayed in.  And I cooked this.  Oh yeah....I cooked that.....


The recipe is fairly simple to follow, which I always appreciate.  My grocer was low on beef by the time I made it in, they didn't have filet mignon steaks so I opted for two 1/2 pound cuts of beef tenderloin.  Frankly, I'm not even sure what the difference is between those. 

For the steaks you will need:
  • Vegetable oil cooking spray
  • 2 (8-ounce) steaks 
  • Kosher salt and freshly ground black pepper
  • 3 tablespoons olive oil
Put an oven rack in the center of the oven. Preheat it to 400 degrees F. Spray a small baking sheet with vegetable oil cooking spray. Set aside. Season the steaks with salt and pepper, to taste. In a large skillet, heat the oil over medium-high heat. Add the steaks and brown on all sides, about 4 minutes. Transfer to the prepared baking sheet and bake for 10 minutes for medium-rare doneness, I went about 12 minutes. Let the steaks rest for 5 minutes on a cutting board. (very important, let the steaks rest!)

For the gravy:
  • 2 tablespoons olive oil
  • 2 large or 4 small shallots, minced
  • 2 cups (about 5 ounces) assorted mushrooms,  coarsely chopped
  • Kosher salt and freshly ground black pepper
  • 1/2 cup dry Marsala wine, I used the Cab we were drinking 
  • 1 1/2 cups low-sodium beef broth
  • 1 1/2 tablespoons chopped fresh rosemary leaves
  • 1 1/2 tablespoons all-purpose flour (I used brown rice to keep it gluten free)
  • 3 tablespoons unsalted butter, at room temperature (I used Earth Balance to keep it dairy free)
In the same skillet used for the steak, heat 2 tablespoons of oil over medium-high heat. Add the shallots and mushrooms and season with salt and pepper, to taste. Cook until the shallots are soft, about 5 minutes. Add the wine and scrape up the brown bits that cling to the bottom of the pan with a wooden spoon. Cook until most of the liquid has evaporated, about 2 minutes. Stir in the beef broth and rosemary.  Whisk in the flour until smooth., I actually saved some of the beef broth to premix the flour into and then poured it into the pan to prevent lumps.  Bring the mixture to a boil. Reduce the heat to a simmer and cook, stirring occasionally, until half of the liquid has evaporated and the sauce has thickened slightly, about 10 minutes. Remove the pan from the heat and stir in the butter until smooth. Season with salt and pepper, to taste.

Cut the steak across the grain (what does that mean anyway?!) and serve with the gravy. 


Now, I no longer eat much meat, but this was really, really good.  The gravy was awesome, salty-but not too much-and flavorful.  The meat was really tender.  I highly recommend it for a fancy dinner at home!

Peppermint cake


This is the first cake recipe I ever attempted after Paulo's diagnosis, I've long since lost the internet link where I found it.  I've made it three times now and I do think that it gets better, and easier, each time.  Gluten free cake is definitely different.  For Christmas dessert I opted for a thin layer cake with crushed peppermint candies between the layers and on top.

  • 1 cup granulated sugar
  • 1 cup sweet white sorghum flour
  • 1/4 cup tapioca flour
  • 1/4 cup cornstarch
  • 1 teaspoon xanthan gum
  • 1/2 teaspoon salt
  • 1 teaspoon baking powder
  • 3/4 cup melted Earth Balance
  • 1/2 cup non dairy milk
  • 3 tablespoons vinegar
Preheat oven to 350 and prepare two round cake pans by greasing and lightly flouring them, set aside.

Mix together the dry ingredients and stir well, with a whisk, to combine. 

Combine non dairy milk and melted earth balance and stir into the dry ingredients.  Add vinegar, one tablespoon at a time, stirring well in between.

Pour half the batter into each pan and smooth out. 

Bake in the center of the oven for 25-27 minutes.  Remove and cool on a wire rack, place a plate on top of the pan, invert and remove from the plate to finish cooling. 

Frosting:
  • 1 cup vegan margarine, cold
  • 2 teaspoons peppermint extract
  • 4 cups confectioner's sugar
  • 2 tablespoons non dairy milk
Cream the margarine and peppermint extract until smooth, add in the confectioner's sugar, slowly, mixing well.  Add in the milk, a tablespoon at a time, until the desired consistency is reached. 

Recipe credit for the frosting goes to Allyson at Manifest Vegan.


Gluten free cake baking is not my strong point, it intimidates me, although to be honest cake baking of any kind intimidates me!  I've had some really, really good gluten full cakes-not baked by me mind you. I think 2011 will be the year of the cake!  I want to learn one awesome gluten free cake this year.  Don't get me wrong, I like this cake, I wouldn't share it with you if I didn't, but it just isn't the same.  I know that someone, somewhere, has perfected the process to create a gluten free cake that has the same texture and consistency as its gluten full cousin, I just need the recipe.  If you have the recipe, post it up in the comments or email it to me.  In the meantime I will begin my own search and my own baking experiments, stay tuned.... 

Tuesday, December 28, 2010

Lemon vanilla scones


  • 1 cup gluten free flour
  • 1/4 cup sugar
  • 1 teaspoon baking powder
  • 1/4 teaspoon baking soda
  • 1/4 teaspoon salt
  • 3/4 teaspoon xanthan gum
  • 1 1/2 teaspoon grated lemon zest
  • 3 tablespoons coconut oil, solid
  • 6 tablespoons vanilla coconut yogurt
  • coarse sugar, optional
Preheat oven to 400 F and line a baking sheet with parchment paper, set aside.

Whisk together your dry ingredients, add the zest and mix well to evenly distribute.

Cut in the solid coconut oil with a form or pastry cutter until there are no solid pieces bigger than a pea.

Add the yogurt and stir until dough comes together.

Scoop with an ice cream scooper onto the lined sheet, flatten if desired, and sprinkle with coarse sugar.

Bake for 12 minutes, serve hot.

Gluten free Gingies


So serious in his decorating
Paulo loves gingerbread cookies, particularly those cut into "gingies". We baked and he decorated gingerbread man cookies last year for all his teachers so I knew we'd need to find a gluten free version for this year. Enter Karina and her wonderful site, Gluten Free Goddess. She posted a recipe a couple of weeks ago for gluten free gingersnap star cookies. With one minor alternation I followed her recipe to the letter. I did not use the nut flour that her recipe called for, there are nut allergies at Paulo's school and I didn't want to risk any exposure, I subbed in millet flour in it's place. 


Cookies for Santa, how could he resist such a face??

The recipe was very simple and straightforward.  We've now made three batches of the dough and have used a variety of shapes to cut them, plus on the last batch I used a small glass to cut them into little circles.  I have one more roll of dough to use up and I think I will freeze it and then slice it thin to get them as crispy as possible.  These will stay in the holiday rotation for sure!


Friday, December 17, 2010

Vegan chocolate fudge


Paulo loves fudge.  He loves to stir the pot.  He loves to lick the spoon.  And he loves to eat piece after piece after piece of fudge.  But the fudge doesn't love him back.  At least not the traditional fudge that I've made every year for the past few seasons that was loaded with butter, condensed milk and marshmallow fluff-did you know there's egg in fluff?  I didn't...until my son was diagnosed with food allergies.  I've learned a lot about the food we eat since my little man was diagnosed last July.  I knew that come December Paulo would want to start baking so I figured I needed to be armed with a few new recipes to try.  He was a bit skeptical, he really loved my fudge, but was willing to try out a new way.

It turns out this recipe was even easier than my old one and, thankfully, just as tasty!

The fudge recipe listed here has quite a few variations.  You can make it with coconut, with peppermint and they even have one shown with crystallized ginger.  I opted for plain, chocolate fudge.

1 Cup Dairy-Free, Semi-Sweet Chocolate Chips (I used extra dark chocolate chips)

3-1/2 Cups Confectioner’s Sugar
1/2 Cup Dutch Process Cocoa Powder
2 Tablespoons Dairy-Free Margarine (see below for soy-free option)
1/2 Cup Regular Coconut Milk
1/2 Teaspoon Vanilla Extract

Prepare an 8x8 pan, I line mine with parchment paper.

In a large bowl combine the chips, sugar and cocoa powder.  Heat the margarine and the coconut milk in a sauce pan over medium heat until the margarine melts and bubbles just begin to break the surface.  Pour the heated milk mixture into the sugar combo, let sit for a few minutes, and stir vigorously to melt the chocolate chips.  Keep stirring until a smooth mixture forms and then add in the vanilla extract.  Pour the fudge into the prepared pan and refrigerate until firm.  Cut into little squares (or big ones!) and enjoy!

Wednesday, December 15, 2010

What's for Lunch Wednesday

Wednesday again?!  Really?  Geesh the days are blurring together.  But since it is Wednesday I will share what Mr. P's been chowing down on this week.  It's been an...interesting week.  I didn't have time to bake bread last weekend so his lunch are getting a little unorthodox!

This went along with an unpictured quesadilla made from corn tortillas and daiya cheddar cheese.  In the big spot we have some Marthas gone Crackers in cracked pepper, 1/2 an apple, snap pea crisps (he didn't like those by the way, guess I'll have to force myself to eat the rest, oh darn!) and off on the side we have some cucumber candy canes with carrot stars and a few cherry tomatoes.  Other than the snap pea crisps he ate everything.  I think this proves the theory that if it's cute-candy cane cucumbers-it will get eaten!


Here's the "mom's out of bread" lunch!  Toasted waffles that he can reheat in class.  One peeled Mandarin orange.  Baby carrots and sugar peas and a soy lemon yogurt parfait made with GF cereal and organic raspberries. 


For more lunch inspiration visit the What's for Lunch in our House blog.

Tuesday, December 14, 2010

Creamy pumpkin soup with scallops


I saw a recipe in my Women's Health magazine for a pumpkin soup with scallops and knew I had to try it.  It looked really easy, perfect for a week night soup, and very hearty.  I adapted their recipe a touch though to suit our tastebuds.

  • one can of pumpkin puree
  • 4 fingerling potatoes, sliced into thin rounds
  • 1 tablespoon honey
  • 1 tablespoon Earth Balance butter
  • 1 cup vegetable broth
  • 1/2 cup coconut milk
  • 1 teaspoon sea salt
  • 1/4 teaspoon cayenne pepper
  • 6 sea scallops
  • salt and pepper
  • toasted almondsthinly sliced onion (optional)
Combine the pumpkin through the coconut milk in a medium sauce pan and bring to a simmer. Stir well to combine and melt the butter.  Season with the salt and cayenne pepper when warm.  Continue to cook until the potatoes are warm.

Dry the scallops with paper towels and season well with salt and pepper.  Heat a saute pan or a cast iron skillet with olive oil and cook scallops until done, about 3-4 minutes per side.

Serve the soup topped with scallops, toasted almonds and onions if desired. 


This recipe would adapt well to a curry style soup...alas I'm married to a man that does not like curry spices.  So, if you try it that way, come back and tell me how it turned out!!

Monday, December 13, 2010

Basil quinoa and red beans


I love basil.  Seriously I could eat it plain off the plant.  I love the smell too, I often stick my nose in the leaves and inhale....bliss.  I wanted some sort of pesto vehicle last night so I made this basil vinaigrette quinoa with red beans and vegetables.  You will need:

  • 1 cup quinoa, rinsed and cooked
  • 1 cup red beans, rinsed, boiled, rinsed again and then simmered on the stove until tender (you can also use your crock pot but for some reason I wanted to torture myself with the stove top method yesterday.)
  • 1 cup frozen corn, cooked according to directions and allowed to cool
  • 1 zucchini, thinly sliced, raw
  • cherry tomatoes, quartered
  • balsamic vinegar
  • sea salt
  • 1 cup extra virgin olive oil
  • 1/2 cup white wine vinegar
  • 3 cloves garlic
  • basil, lots and lots of basil
When the beans are close to being done add balsamic vinegar and sea salt to taste.  I added about 1 tablespoon-eyeballing it-and a pinch or two of salt.  Not too much though because you will use salt in the vinaigrette.

Combine the cooked quinoa and red beans in a large serving dish.  Add in the vegetables and mix well. 

In a blender combine the oil through the basil and salt to taste and blend well until combined.

Pour the vinaigrette onto the quinoa and beans and toss well to coat.  Serve warm.  Refrigerate the left overs and enjoy as a cold lunch the next day....like I'm doing, right now.  I love basil....

Friday, December 10, 2010

Orange noodles


This is based loosely on the recipe I found on Manifest Vegan for Orange sesame vermicelli.  I saw loosely because when it came time to make it I discovered that I did not actually have the sesame oil or rice wine vinegar called for in the recipe.  Plus when I pulled out my bottle of toasted sesame seeds I was surprised to find that they expired...in 2008.  Bummer.  I suspect that when I make it again and actually can follow the recipe I will like it even more.  In the meanwhile, this ended up pretty tasty, even had high marks from my carnivore husband, so I'm sharing the modified version.  (Click the link above for the original version and be prepared to be wowed by her fabulous photography as well!)

Orange rice noodles
Thin rice noodles, cooked according to directions
1 tsp gluten free tamari
zest of one orange
1/2 cup fresh orange juice (I used 1 1/2 oranges to get 1/2 cup juice but I was juicing by hand, I'm sure if I'd have hauled out my Breville I would have used less fresh fruit)
1/2 tsp fresh grated ginger
3 tsp agave syrup
1/2 tsp ground cloves
2 tsp olive oil
1 tbsp white wine vinegar
2 carrots, julienned
1/2 package tempeh, thinly sliced
2 tbsp tamari
1 tbsp olive oil
1 tbsp agave syrup
1/2 tbsp white wine vinegar
1 tbsp water
dry roasted peanuts
Directions:
Combine 1 tsp tamari, orange zest, orange juice, grated ginger, 3 tsp agave syrup, cloves, 2 tsp olive oil and 1 tbsp vinegar. Add to julienned carrots and tempeh in pan and cook over medium heat until most of the liquid is absorbed, the tempeh is warmed through and the carrots are cooked.

In separate small bowl, mix together 1-2 tbsp tamari, 1 tbsp olive oil, 1 tbsp agave syrup, 1/2 tbsp vinegar and 1 tbsp water.  Coat cooked rice noodles with this mixture.  Taste and adjust seasonings as needed.  Put the noodles into a large serving dish, top with the cooked carrots and tempeh and sprinkle dry roasted peanuts on top.  Serve warm.
I served this with sauteed portabella mushrooms and steamed bok choy dressed with a little lemon and umeboshi vinegar.

Thursday, December 9, 2010

What's for lunch-Paulo


Little P has in his lunch today a tofutti cream cheese and orange marmalade jelly sandwich on Momma made gluten free honey oat bread.  A checkerboard apple, carrots and cucumbers cut into cute flowery shapes and some Kettle chips.  I also included a dish of vanilla rice yogurt and gluten free cereal for his morning snack.

I invested recently in some cute bento supplies.  I got an assortment of stainless steel cutters as well as some new silicone dishes.  I also bought an adorable two tier dish that I used this week for fruits and veggies. 


Pardon the poor quality picture, I'm in need of a new camera!
In this dish he has carrot and cucumber stars and olives on the bottom with some roasted red pepper sauce for a dip.  And on the top he has apple slices and pomegranate seeds with some marionberry coconut yogurt.  The dish, while adorable, turned out to not be very practical for him, they opened and spilled, his lunch box was a mess.  The cute container I bought for myself came with an elastic band to keep things closed, I think I will definitely be using some sort of band next time I give this to Paulo and I will omit the open dishes of dips.   I'm enjoying the cute factor, but really what matters is getting the cute into his belly right?  It's a work in progress! 
For more adorable lunch inspiration visit What's for Lunch Wednesday!

Tuesday, December 7, 2010

Raw brussels sprout coleslaw


  • Brussels Sprouts, stem removed and thinly sliced
  • Granny Smith apple, cored and thinly sliced
  • Veganaise
  • Juice of one lemon
  • White wine vinegar
  • Olive oil
  • Sea salt
Combine the sprouts and apple in a bowl and set aside.  In a small bowl stir together the veganaise (or mayo) and the lemon, whisk well to combine.  The amount of the veganaise is variable depending on how creamy you like your coleslaw, I used about 2 tablespoons.  Coat the cut sprouts and apple with the veganaise and stir well to combine.  Add sea salt to taste and set aside.  Prior to serving, drizzle with vinegar and olive oil and retoss.

Creamy roasted red pepper sauce


I wanted a quick and easy sauce last night that would utilize the jar of roasted red peppers I had languishing in my pantry.  My boys both love red peppers, Rene is not a huge fan.  So, to try to lessen the red pepper-i-ness I also used tomato in the sauce. 

Into the blender add the following:
  • Block of tofu, firm
  • 1/2 jar of roasted red peppers
  • 1 cup tomato sauce, I used a bottled plain tomato, you could also use fresh if you want a chunkier sauce
  • 1/2 cup nutritional yeast
  • Minced garlic, 1-2 teaspoons depending on preference
  • Balsamic vinegar, 1-2 tablespoons
  • Olive oil, 1 teaspoon
  • Sea salt to taste
Blend on high until combined, taste and adjust seasoning.  I added a bit more garlic and vinegar to mine. 

Cook the pasta according to directions and coat with the sauce, rewarm if needed.  Top with thinly sliced red onion and fresh basil.

Wednesday, December 1, 2010

Holiday side dishes

I didn't take pictures of these two dishes, I was too busy eating them!  As a child I loathed Brussels sprouts.  As an adult I came to realize that I hated them so much because my Mother murdered them.  They ended up stinky mushy lumps that I was forced to eat.  A few years ago, out of love for my older sister, I tried them again.  I sauteed them with bacon-doesn't bacon make everything better?  This year, since I'm a pseudo vegetarian I wanted to minimize the flesh at the table to the bird and started looking for a sprout recipe that did not involve piggy.

Enter the wonderful chefs at The Whole Life Nutition Kitchen!  In all the hoopla leading up to Thanksgiving they were kind enough to post a recipe for sauteed Brussels spouts with shallots and cranberries.  It also included one of my all time favorite things, silvered almonds.  This was a really quick and easy dish, I prepped the sprouts, sliced the shallots and measured the almonds and cranberries before everyone arrived and then prepared the dish while the turkey was resting.  It was delicious, I will definitely be making it again and I may not wait until next Thanksgiving to do it!

The other new side dish I made last week was a roasted yam dish I found on the For the Love of Cooking blog.  This one also involves cranberries, very festive addition this time of year, and called for pecans.  I didn't have pecans on hand so I subbed in walnuts and almost poisoned my cousin, sorry Leslie, I didn't know you were allergic to walnuts!  A major plus on this dish was the do ahead factor, the yams were peeled and diced well in advance, the walnuts and cranberries measured out and ready to be poured on top of the yams when it was time.  I didn't have to monitor the dish much so I was able to relax and chat with family as they arrived and generally relax. 

My only complaint about the two dishes...I didn't make enough of them!  I will certainly remedy that error next year! 

That's the last installment of Thanksgiving at casa de Rodriguez.  We're on to holiday baking now as I experiment with making fudge diary free.  Wish me luck!

Monday, November 29, 2010

Gluten free pumpkin pie

First a HUGE thank you to Karina at Gluten Free Goddess.  She may have singlehandedly made my son's first wheat and dairy free Thanksgiving a success!  Let's face it, when you're 6 it's all about the pie.  You do not care how long your Momma slaved over the turkey, you want your pie.  And when you can no longer eat Mrs. Smith's without running the risk of an ear or sinus infection you do not care, you still want your pie.

Enter Karina and one of the simplest pie recipes I've ever used, vegan gluten free pumpkin pie!


I'll save you from reading all the nitty gritty details, because really you should go over to Karina's website and look around, prepare to be inspired, she's an amazing cook and quite the entertaining blogger, but I will say that this recipe took about 5 minutes to prepare and involved only two kitchen items, three if you count the oven.  I needed my food processor and a glass pie plate, well and measuring spoons but really, who counts those?  In the interest of full disclosure, I used coconut milk, full fat, and I did not have bourbon vanilla so I used my regular old vanilla.

Paulo gave the pie 10 thumbs up, he was a very happy child on Thanksgiving night!

Sunday, November 28, 2010

To brine or not to brine

To brine or not to brine, that is the question, do you brine?  Wet or dry?  I only recently read about a dry brining technique, I may try it next year, but I didn't have enough time.  It involves massaging a salted turkey over the course of three days.  I picked up by bird Tuesday night, I was curious about this technique but didn't allow for enough time so I stuck with my traditional wet brine method.

I love the results of a wet brine but man I hate the process!  I buy a big bird, this year's was 28 pounds, add to that a couple gallons of salted water and we have a seriously heavy pot to haul to the fridge in the garage, well Rene has a seriously heavy pot to haul around!

I use the following:
  • 2 cups kosher salt
  • 1/2 cup brown sugar
  • 1 lime, quartered
  • 1 orange, quartered
  • fresh herbs; sage, rosemary, thyme and oregano
  • garlic cloves
  • peppercorns
  • lots and lots of water
I brined for about 15 hours this year, shorter than previous years but I read recently that to over soak the bird can lead to a mushy textured meat.  And nobody wants mushy turkey. 

When I'm ready to roast I stuff a quartered lemon, a quartered apple and as much of a red onion as I can into the cavity and also add some more of the fresh herbs.  I pour olive oil on top and massage in some pepper and coarse sea salt and into the oven it goes.  This bad boy roasted for one hour at 425 and then another five or so at 325.  

Now, I will admit that gravy is my single most anxiety inducing step of hosting Thanksgiving dinner.  Gravy can make or break the meal....so don't mess it up!  No pressure huh?  This year I went a slightly different route with that in mind.  I laid out celery, red onion and carrots underneath the roasting pan and added the left over fresh herbs (not the ones from the brine!).  I added a cup or two of water and then put the bird in the oven.  About three hours into the roasting time I warmed up one cup of good pinot noir and added 1/2 dozen or so whole cloves to the wine while it warmed.  I basted the bird with the warm wine and then left it alone again for another hour.  Then I basted it again with the pan drippings.  When the bird was done I removed the roasting rack and put the drippings through a sieve, smashing the solid vegetables to extract as much juice as possible.  I made a slurry (just learned that word this year!) of GF flour and water, I used two tablespoons of flour, and whisked that into the pan drippings.  That's all I did, I did not have to add any more salt or pepper to the gravy, just whisk until thickened.  With all humility I can say it was the best gravy I've ever made, I was...surprised.  Seriously out of the whole meal, the gravy is what scares the heck out of me!  For the first time I was really happy with the end result, hopefully I can repeat the performance next year....no pressure.


Saturday, November 27, 2010

A tale of two cranberries

I grew up eating jelly cranberry sauce, from the can.  Even now I love to see the ridges that are molded into the cranberry when it is plopped onto a plate, makes me nostalgic.  However, my personal dining tastes have evolved a bit and I like to experiment in the kitchen so have not been satisfied with the jelly for years, each year I tweak my recipes.  This year, I made two different sauces for Thanksgiving dinner.  The first is my spicy cranberry sauce:


  • one bag of cranberries, sorted and rinsed
  • 1 cup water
  • 3/4 cup sugar
  • 1/2 cup raw apple cider vinegar
  • 1/2 teaspoon paprika
  • 3 serrano chiles, sliced (remove the seeds if you want less heat)
  • 1/2 cup cilantro, stems removed
  • 1/2" ginger, grated
Add all the above into a medium sized sauce pan and bring to a boil, simmer until the cranberries pop and the sauce thickens.  Chill overnight to allow the flavors to intensify.

The second is the sweet cranberry sauce:


  • one bag of cranberries, sorted and rinsed
  • 1 cup water
  • 3/4 cup brown sugar
  • 1/2 cup balsamic vinegar
  • 1 apple, peeled and cored
  • 1/2 cup raisins
  • 1/2 teaspoon each cinnamon and nutmeg
Add all the above into a medium sized sauce pan and bring to a boil, simmer until the cranberries pop and the sauce thickens. Chill overnight to allow the flavors to intensify.


Hope you all had a wonderful Thanksgiving surrounded by those you love, I will share a few more recipes from our day with you all this weekend!


Wednesday, November 24, 2010

What's for Lunch Wednesday


It's that time of the week again!  Time to see just what my 1st grader has been eating.  Time to link up with What's for Lunch Wednesday on the Bento Lunch blog and get inspired for lunches to come.

This is one of Paulo's lunches from his last week of school before the Thanksgiving break.  In here we have some sliced oranges and kabobs with carrot slices and green olives.  I also used a cookie cutter to shape a cucumber into a candy cane.  Interestingly enough...he ate it!  I guess he really will eat just about anything as long as it's cut cute!  The main compartment holds a new item I found at my local New Seasons market.  They are called Oregon Harvest Veggi Tots from Chez Gourmet from Marie.  To see what's in them click here!  I picked them up because they are vegetarian-which is a requirement from the lovely people that own the building we are renting for school, our lunches must not contain meat-and because they have no wheat in them!  It is really hard to find a vegetarian "meat" sub that does not contain wheat!  All the veggie nuggets I've seen use wheat in one way or another.  I have wheat free chicken nuggets but I can't send them to school!  Anyway, I was nervous frankly, there's lots of good healthy things in these that kids routinely turn their noses up at.  But Paulo, as usual, surprised me and LOVED them!  I will definitely be using these again when school starts up as a sandwich alternative.

For other great lunch box ideas visit What's for Lunch in Our House!

Tuesday, November 23, 2010

Hummus spree!

I love hummus, I love to eat it plain, dip veggies in it, pita bread, use it in place of mayo...anything!  A lot of prepared hummus in the stores though have extra junk it them that I don't really want to consume.  Plus, when you look at the prize of garbanzo beans plus the other required ingredients, the premade hummus is really spendy! 

This week, I am enjoying two kinds of hummus, prepared by my own two hands.  The first is a raw cashew hummus from Karina at Gluten Free Goddess.  It is unbelievable!  I could seriously eat the whole batch in one sitting and not feel guilty....well maybe a little.


To a high powered blender add the following:
  • 1 cup soaked raw cashews, drained
  • 1 tablespoon raw organic tahini (I will admit to buying plain old tahini!)
  • Juice form 1 fresh lemon, or to taste (I used 1 1/2 lemons)
  • 2 tablespoons extra virgin olive oil
  • 1/4 teaspoon onion powder (omitted from mine because I forgot to buy more!)
  • 1/2 teaspoon garlic powder
  • sea salt to taste
Blend on high until smooth and creamy, taste and adjust as needed.  If you want more "body" add more olive oil, if you like a stronger tahini taste, add an extra tablespoon of that.

Store in the fridge and serve with fresh vegetables, enjoy!  It's so good I eat it plain.


My second hummus chilling in my fridge is a lemon basil hummus.  To my Vita Mix (thanks DAD!!) I added the following:
  • 2 cups cooked chickpeas (canned is fine, I used my pressure cooker and cooked them for about one hour)
  • 1/4 cup of the chickpea broth
  • 3 tablespoons olive oil
  • 2 tablespoons tahini
  • 3 garlic cloves
  • Juice of 1 1/2 lemon
  • Fresh basil leaves, about 1/4 to 1/2 cup whole leaves, I really love basil!
  • Sea salt to taste

Blend on high, taste and adjust seasonings as needed.  Chill in the fridge and enjoy with fresh vegetables or as a sandwich spread.

Sunday, November 21, 2010

Kitchen Sink Soup

We've all done it, our eyes were bigger than our stomachs at the grocery store.  We tossed leafy greens into our cart with reckless abandon, oblivious to the short shelf life of these super foods.  Personally I hate throwing money away and that's literally what we do when we toss away bags of spoiled fruit and vegetables into the garbage pail or compost bin.  One of my goals for the end of this year and into next is to stay on budget with my grocery bill.  I can accomplish that in two ways, one is to spend less-obviously!  The other is to use what I buy.  Enter soup!

Kitchen Sink Soup


It's been getting cold here in the Pacific Northwest!  Which makes it the perfect time of year to savor a nice bowl of homemade soup.  Which is also the perfect way to use up the extra veggies you (I) may have...over bought....

Olive oil
1/4 Red Onion
Garlic, three cloves, smashed and sliced thickly
Carrot, two, thickly sliced
Potato, two, sliced
Ginger root, 2" whole
Spinach, cleaned and removed from stem
Collard Greens, one bunch, removed from stem and sliced
Oyster mushrooms

Heat olive oil in a large soup pot and saute the onion until soft.  Add the garlic and saute until fragrant.  Add the carrots and potato, saute, add in the greens and ginger and fill the pot with filtered water.  Season with salt and pepper to taste.  Float the mushrooms on top and simmer until veggies are soft.  Check and adjust seasonings as needed.


Soup is very forgiving.  You can dress it up with exotic spices or keep it simple with just salt and pepper.  I floated 1/2 dozen whole peppercorns in the pot while it simmered, you can add any herbs you might have on hand as well.  It might seem easier to pop open a can of Campbells but there's nothing like a pot of soup simmering on the stove on a chilly night, and there is really nothing like knowing I'm not tossing my money into the trash pile.  It's a win-win for sure!

Thursday, November 18, 2010

Quinoa with vegetables


I love quinoa, it's a very nutritious grain and, as a total bonus, takes 15 minutes to cook!

1 cup quinoa, rinsed
2 cups water
1 zucchini, thinly sliced
1 carrot, thinly sliced
1 cup edamame, shelled
1/4 cup olive oil
3 tablespoons soy sauce (wheat free if you need that)
2 tablespoons Srirachi
1/2 lemon, juiced

Bring two cups of water to boil and add the quinoa, stir it once and then put the lid on and leave it alone.  After about 7 minutes, add the edamame and carrots, put the lid back.  When the quinoa is done cooking remove from the heat, add in the zucchini and leave with the lid on.  The residual heat will slightly steam the zucchini, I prefer it crunchy.

Combine the oil, soy sauce, srirachi and lemon juice, whisk well to combine.  Pour over the cooked quinoa and stir well to combine.

Satueed spinach with walnuts


Very quick side dish for a busy weeknight! I loved it, Paulo gave it a "so-so" rating, but at least he tried it and ate the walnuts.

1/4 red onion, thinly sliced
3 gloves garlic, sliced
Spinach, washed and stems removed, still damp (this would work with baby spinach as well)
walnuts, about 1/4 cup
olive oil
balsamic vinegar

Heat the olive oil in the pan, about two tablespoons.  Add the red onion and saute until soft.  Add the garlic and cooking until fragrant, add in the walnuts.  Dump in the damp spinach and stir well, put the lid on and walk away for about two minutes.  Come back and sprinkle the whole bunch with balsamic vinegar, serve hot.

Sunday, November 14, 2010

Sicilian Collard Greens with pine nuts and raisins

Simply AMAZING
Recipe from The Kind Diet by Alicia Silverstone

1 bunch collard greens
2 tablespoons pine nuts
3 garlic cloves, peeled and chopped
1 tablespoon olive oil
3 tablespoons raisins
2 tablespoons balsamic vinegar

Use a sharp knife to cut out the central rib and stem from each collard leaf.  Rinse the leaves in a sink of cool water, lifting them into a colander to drain a bit (you want some water to remain on the leaves).

Toast the pine nuts over medium heat in a dry skillet for about 5 minutes or until golden.  Shake the pan often to keep the pine nuts from burning.  Transfer to a plate and set aside.

Place the garlic and oil in a large skillet and saute over medium heat for 1 minute or until the garlic is fragrant.  Add the damp collards and stir, then cover the pan and cook for 2 minutes longer.  Add the raisins and pine nuts and stir.  Cover and cook for 2 minutes.  Stir in the balsamic vinegar, cover, and continue to cook for 1-2 minutes longer.

This dish is AMAZING!  It combines the sweet from the raisins and the tang of the vinegar perfectly.  I think I could eat it daily and not get tired of it!

Saturday, November 13, 2010

Noodles and "cheese"


Saying goodbye to macaroni and cheese was one of the hardest parts of Paulo's elimination diet.  He loves mac and cheese, I had switched to Annie's to reduce my feelings of guilt for feeding my child from a box but secretly I loved the good old Kraft as much as he did.  Kraft Mac and Cheese was one of the first things I learned to "cook" for myself as a child.  I remember standing in the kitchen of our apartment when I was in 5th grade, reading a book and stirring the pot of noodles.  I have very fond memories of that neon orange sauce and it's salty, tangy taste when I would eat it plain from the mixing bowl....good times....But with Paulo allergic to wheat and to cheese packaged mac is out of the question.  Annie's has a wheat free box but it still has dairy in it, so I decided to try to whip up something on my own.  The resulting sauce was good, Paulo declared it the best ever but really the boys has been deprived of mac and cheese since July so I think that might have influenced his taste buds, I still think it could use some tweaking.

3 tablespoons Earth Balance margarine
2 tablespoons brown rice flour
2 cups plain almond milk
1 package Daiya cheddar
1 teaspoon ground mustard
1/2 teaspoon garlic powder
1/2 teaspoon salt
1/4 teaspoon pepper
1 package quinoa pasta, cooked according to directions

Melt the butter in the pan, add the flour and whisk well to combine.  Stir in the milk, whisking constantly to prevent lumping.  Bring to a simmer, stir in the Daiya and spices.  Add the cooked pasta and stir well to coat the noodles.

Friday, November 12, 2010

Sauteed zucchini and radishes


2 zucchini, sliced thickly
6 radishes, sliced in half then quartered
3 cloves garlic, whole
teaspoon of olive oil

Heat olive oil in the pan, add the garlic and saute until fragrant, add the zucchini and radish tossing well, saute 2-3 minutes, add sea salt if desired.

I had read about sauteed radishes in Cooking Light or Rachel Ray, can't remember which.  Now I personally really love raw radishes but they are very strong, when you cook them it takes away a little of the pungency which made them easier for the kids to eat-I still don't think they liked them but at least they tried them!

Thursday, November 11, 2010

Curry tofu salad


Paulo woke up really, really early Sunday morning-thank you time change!  The only benefit to that was turning on the Food Network and catching a bit of The Barefoot Contessa.  She was all about chicken Sunday morning, roasting it, making sandwiches from it and also a curried chicken salad.  I watched that and thought...that would be easy to make vegetarian!

Curry Tofu Salad:
1 small block of extra firm tofu
2 stalks celery, sliced
1/4 red onion, finely diced
1/2 cup veganaise
1 lemon
1/2 teaspoon curry
1/2 teaspoon cardamom
1/2 teaspoon tumeric
1/4 cup raisins

Drain the tofu, I lined my colander with a paper towel, put the tofu in, covered it with a small plate and then weighed that down with a full tea kettle.  When it is drained well, slice it into bite sized pieces.

In a medium sized bowl add the veganaise and the juice from the lemon.  Mix in the spices, the celery and the onion and stir well.  Stir in the drained and sliced tofu and sprinkle with the raisins.  Cover and set aside in the refrigerator, I left mine over night so the tofu really tasted like the spices.  Serve stuffed in a pita bread or on a bed of cabbage leaves.

Wednesday, November 10, 2010

Roasted vegetables over lentils and rice with cranberry sauce


It's almost Thanksgiving, my favorite holiday.  Next week I will start experimenting with dishes I am interested in introducing to my table.  This week though I was craving cranberry sauce.  I decided to make a simple cranberry sauce to serve over grains and roasted vegetables.

Cranberry sauce:
1 cup cranberries, sorted and rinsed
1 orange
1/4 cup real maple

Put the cranberries into a pot, juice the orange and stir in the maple, bring to a boil.  Reduce heat and simmer until cranberries pop and a thick sauce forms.  Set aside and keep warm.

Roasted vegetables over lentils and rice:
1/2 cup lentils, sorted and rinsed
1 cup brown rice
2 cups water
2 cups vegetable broth, low sodium
2 yams, sliced into 1/4" rounds
2 parsnips, sliced into 1/4" rounds
Broccoli, washed and cut into florets
1 zucchini, sliced into 1/4" rounds
2 leeks, thick chopped, whites and greens

Preheat oven to 350.

Cook the rice and lentils according to direction (I was fortunate in that the brown rice I'd bought needed about 25 minutes, as did the lentils, so I put them all in the same pot to cook together).

Set a steamer basket over a large pot of water, bring to boil, steam the yams, parsnips and broccoli until just barely tender.

On a large rimmed baking sheet lay out the vegetables in a single layer, drizzle with olive oil and season with sea salt.  Roast in the preheated oven until potatoes are tender and the other vegetables develop a nice char, took me about 20 minutes. 

Serve the lentils and rice topped with the vegetables and the cranberry sauce.  Mmmm, cranberry sauce...tastes like Thanksgiving!


What's for lunch Wednesday


Time to visit Bento Lunch's What's for lunch Wednesday for inspiration! 

Here's Paulo's:
  • sunbutter and jelly sandwich on vegan buckwheat bread
  • apple slices
  • kettle chips
  • kebobs with green olives, cherry tomatoes and soy cheese
He was particularly impressed by the kebobs, eating anything on a stick apparently makes it so much more exciting!

Tuesday, November 9, 2010

Tofu breakfast scramble


I've been secretly living my life as a vegetarian for the past 6 weeks.  It started as a challenge for myself with the hope of winning a prize.  October was Vegetarian Awareness month and I found a link on the Vegetarian Times facebook page for a pledge campaign.  You could pledge to be vegetarian for a day, a week or a month.  If you pledged you were entered to win a prize.  The prize for pledging, and completing, a month was $1,000.  That was very tempting.  I was already curious and open to the idea of being a vegetarian, I'd get a bit grossed out by raw meat and if I stopped to think about what I was biting in to, so I took the plunge and signed on for a month.  October is over, I didn't win any money, but I still haven't eaten meat and frankly, I'm a bit scared to now, I'm not quite sure how my stomach would react. 

Along the way I started and finished The Kind Diet by Alicia Silverstone.  Great book, a lot of really useful information and a ton of fabulous vegan recipes.  I created this meal with inspiration from the book.

1 cup precooked brown rice,
1/2 cup extra firm tofu, I used my leftovers from a previous meal
mushrooms, chopped
zucchini, diced into 1/2 moons
onion, finely diced, as much or as little as you like
cherry tomatoes, halved
avocado, about 1/4 of a good sized avocado

Heat olive oil in a pan and saute the onion.  When soft add the mushrooms and zucchini, the tofu and rice.  Heat through.  Remove from heat and add the tomato and avocado. 

This is a great way to get more grains and vegetables into your day, I ate this for breakfast but it could also easily be a satisfying light lunch or filling dinner if you want to add a side of greens either raw or sauteed.  It might sound odd to eat onion and zucchini for breakfast but this was a really tasty alternative to eggs and I was very full and felt energized and ready for my day.


Monday, November 8, 2010

Vegan chocolate cookies

Mmmm chocolate... is there anything better? 

During Paulo's elimination period I spent a lot of time learning to cook and bake bread allergen free.  I honestly didn't worry too much about desserts and cookies.  It was summer, fresh fruit was abundant and we had coconut milk ice cream, so what more did we need?

Chocolate, we needed chocolate!  Well, at least I needed chocolate!  As luck would have it, Paulo's got my sweet tooth so he wholeheartedly agrees with my chocolate cookie baking and gave this recipe two happy thumbs up.


One of the blogs I frequent for cooking inspiration is Manifest Vegan.  By nature of the vegan part I'm guaranteed to find recipes that do not include eggs of dairy and many of them are also wheat free as an added bonus.  Before Halloween there was a recipe for chocolate brownie bats.  I knew right away I wanted to make them.  As luck would have it I had everything I needed already.  I finally got around to baking them on Halloween. 


I made two batches of the cookies in Halloween shapes, bats, skulls and pumpkins and then, then I got lazy.  I got tired of chilling and re rolling the dough.  Not wanting to waste all that chocolatey goodness I created the lovely morsel pictured below.  Thumbprint raspberry cookies.  I rolled bits of dough into a ball, smashed my thumb in there, dropped in a couple of dark chocolate chips and perched a fresh raspberry on top.  Into the oven they went and out came deliciousness!  

Pretty isn't it?

I will admit to some hesitation about learning to cook allergen free.  I grew up on eggs and milk in my cookies and the usual gluten filled flour.  Baking without those things can be tricky, some of my experiments have turned out great and some....well, they were nothing to write home about.  These cookies turned out great, crispy on the edges, chewy in the middle and full of chocolate flavor.  I will definately make them again and if you're close enough to dine with me over the holidays you just might end up eating them yourself!

Friday, November 5, 2010

Savory corn waffles and sauteed cabbage


I love breakfast for dinner!  Tonight I wanted something that would compliment a sauteed cabbage recipe I wanted to experiment with.  The cabbage would have some honey in it so I went for a savory corn waffle.  I stared with my basic corn pancake recipe and modified from there.

I used water instead of rice milk and I added an extra bit of corn meal for extra crunchiness!  I made the full recipe then divided it into three dishes, one for me, one for Paulo and one for Rene.  To each I added 2 tablespoons good grainy mustard.  To Paulo's I also added shredded soy cheese and diced ham.  To Rene's I added shredded mozzarella, diced ham and sliced pepperocinis.  To mine, I added just shredded soy cheese and pepperocinis.

The cabbage:
1/2 head of cabbage (I think mine was savoy, napa would work too)
2 apple
1 tablespoon honey
1/8 cup balsamic vinegar
1/4 cup walnuts, toasted
1/4 cup dried cranberries.

Toast the walnuts in a dry pan, set aside.

Core and thinly slice the cabbage, rinse in a colander and set aside.

Core and thinly slice the apples, set aside.

Combine the honey and vinegar.

Heat olive oil in a deep pan, add the cabbage and toss well.  Cover and allow to cook for a minute.  Add the onion and the honey/vinegar sauce, toss well to coat, cover the pot.  Finally add the cranberries and walnuts, taste and add salt if desired.

Cook the waffles and serve along side the sauteed cabbage.

Wednesday, November 3, 2010

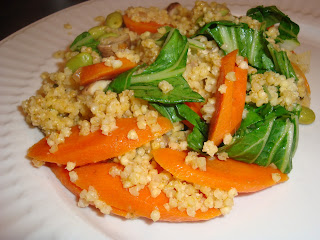
Asian millet stir fry


Cook millet according to directions and set aside.

Prepare vegetables:
  • Two carrots, peeled and sliced thin on a diagonal
  • One small head of bok choy, thinly sliced, white and green separated
  • 1/4 onion, finely diced
  • Edamame, shelled-I used frozen
  • 6 mushrooms, quartered

Prepare marinade:
  • 1/2 cup olive oil
  • 1/4 cup white wine vinegar
  • 1 tablespoons bragg liquid amino (or soy sauce if you're not allergic to wheat)
  • 2 tablespoons chile sauce, I used sriracha
  • 1 lemon, juiced
  • 3 cloves garlic
  • 1/4 cup cilantro
  • 1" fresh ginger, grated
  • 2 teaspoons honey
Combine in a blender and blend until smooth and combined, taste and adjust as needed. 

To a steamer basket add the carrots and allow to steam for a couple of minutes then add in the edamame and the white portion of the bok choy. Steam until crisp tender. Set aside vegetables and drain the water. Add olive oil to the pan and add the onion, saute until tender. Add in the steamed vegetables and the fresh mushrooms.
When the vegetables are close to done pour 1/2 of the marinade into the pan and stir well to combine, add in the cooked millet and stir until the grains are coated with the sauce and mixed in well with the vegetables.  Add the green portion on the bok choy, remove from heat, and put the lid on your pan to lightly steam the bok choy.  Stir before serving and enjoy!

Thursday, October 28, 2010

The high cost of healthy

A short time ago we talked about the decreasing consumption of fruits and veggies.  Americans, despite all the education to the contrary, are still moving in the opposite direction with this relatively simple step to improve their health.  The high cost of fruits and veggies was one potential stumbling block that was brought up.  I decided then to keep my receipts for groceries for a month and see just how much money am I spending on produce. I know my family eats a lot of produce.  It shows up at breakfast, banana sliced in oatmeal, it makes repeated appearances at lunch, diced bell pepper, avocado, carrots, and it often takes center stage at dinner.  Plus there are certain things I insist on buying organic-apples, greens and potatoes to name a few.  I was curious to see just what percentage of my budget was being spent on produce. 

I saved all my receipts from October and high lighted the fruits and vegetables, including frozen foods like berries for my smoothie.  Then I totaled up the highlighted pieces and compared that to my totals.  I know how much I spend routinely on groceries in general, I use http://www.mint.com/ for tracking my spending and planning budgets-very useful tool.  This month I spent $235.98 on fruits and vegetables.  It accounts for 33.9% of my total grocery expense.  I averaged $22.00 a day for a family of four-breakfast, lunch and dinner more days than not, because of Paulo's food allergies dining out has dramatically decreased.  I'd like to get that under $20.00 a day, that's my next challenge.  But back to the veggies.  $235.98 what did that buy me?  Multiple heads of kale and romaine lettuce, quite a few cucumbers and heads of celery, herbs like oregano, basil, parsley and cilantro, 4 or 5 red bell peppers, many pounds of spuds, close to 10 pounds of apples, a lot of bananas and pears, mango, onion and avocados-probably close to 8 of those-pints of blueberries and raspberries, tomatoes by the dozens, garlic, ginger, chard, cabbage, artichokes, brussel sprouts, chiles, mushrooms and tomatillos.  Heads of broccoli, close to 6 pounds of spinach and I can't count how many zucchini and beets.  The list goes on and on and on.  Track how much money you spend on meat and I dare say the list will be much, much shorter.  Yes, eating healthy is expensive, but there are trade offs.  I spend more on veggies but less on doctor visits and prescriptions.  I spend a lot of money on fruit but never miss work-other than for kid stuff.  I look at that 33% and see it for what it is, an investment in my health and in my family's health.  Plus, as an added bonus, it's a tasty investment.

How can you increase your consumption of vegetables?  Start small, try a green smoothie.  Add cut vegetables in the lunch box-just start bringing your lunch at all if you routinely are buying it you can find countless ways to increase your veggies.  Start dinner with a big salad.  Commit to the Meatless Monday movement.  You really will not miss meat this one day!  Do a search for meatless meals, you will be blown away by the options that show up.  Check out a vegetarian cookbook from the library and copy off some that look interesting to you.  Get the kids involved, let them pick out a fruit or veggie they haven't tried but looks interesting.  Prepare it together.  Make dips or sauces to go with your veggies.  There is nothing wrong with a light, homemade, sauce added to broccoli! 

Food, it can make you sick, or it can heal you.  It really is that powerful.  And the choice really is yours.